If you’ve ever struggled with DCOM OPC errors, firewall configurations, or complex OPC connectivity setups, you’re not alone.
OPC communications, especially over a distributed architecture, can be fragile, insecure, and frustrating to maintain.
This is where OPCNet Broker®, Integration Objects’ secure and DCOM-free OPC tunneling product, comes in. It securely transmits OPC DA, HDA, and AE data across firewalls, domains, and remote sites. If you’re new to the concept itself, our guide on what OPC tunneling is and how it works is a good starting point before diving into setup.
In this post, we’ll walk you through the OPCNet Broker® setup in under 30 minutes, from installation to configuration, so you can focus on operations, not connectivity issues.
What is OPCNet Broker®?
OPCNet Broker® is a high-performance OPC tunneling product designed to:
- Eliminate DCOM configuration headaches
- Support real-time, historical, and event-based OPC data
- Secure OPC communication with data encryption and user authentication
- Simplify remote access across segmented or wide-area networks
What is a secure OPC tunnel?
A secure OPC tunnel is a communication channel that lets OPC clients and servers exchange data without using DCOM, through encrypted or otherwise controlled TCP/IP communication, across firewalls, domains, and WAN environments. It gives you data integrity, secure authentication, reliable connectivity, and a much simpler network configuration than a native DCOM connection ever could. OPCNet Broker® implements this by encapsulating OPC traffic within a secure, controlled tunneling layer.
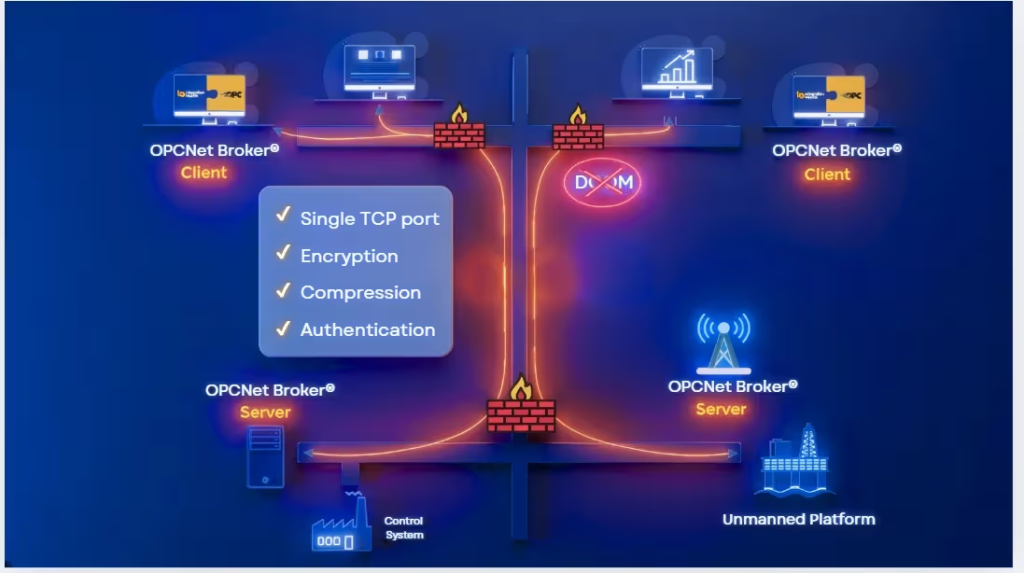
OPCNet Broker® architecture overview
OPCNet Broker® consists of 2 components that work together to form the tunnel:
- ONB Server Side – installed on the OPC Server machine
- ONB Client Side – installed on the OPC Client machine
Together, they create a secure OPC tunnel over a single, configurable TCP port – the two components talk to each other across the network so the OPC applications on either end communicate through the tunnel.
Prerequisites:
Before starting, ensure you have the following:
- OPCNet Broker® installation package from here
- Admin rights on OPC server and client machines to run the installation programs
- Required .NET Framework version (2.0 or 4.0, depending on your OS version
- IP address of the OPC Server machine
- Firewall access to allow the ONB TCP port
Step 1: Install ONB Server on the OPC Server machine
- Copy and unzip the installation package onto the OPC Server machine.
- Select the appropriate setup based on your OS: use .NET Framework 4.0 for Windows 7 and higher / Server 2008 and higher, or .NET Framework 2.0 for legacy systems (Windows XP / Server 2003).
- Right-click the ONB Server setup executable and select “Run as administrator”.
- Follow the Install Wizard to complete setup.
- Configure the ONB Server service a follows:
- Open Windows Services.
- Locate “Integration Objects OPCNet Broker® Server”.
- Right-click → Properties → go to the “Log On” tab.
- Choose “This account” and enter credentials for a user account with access to the OPC Server and read/write permissions to the ONB folder and Windows Registry.
- Start the OPCNet Broker Server service.
Step 2: Configure firewall and network access
- Open the ONB TCP port between the server and client machines
- Ensure no security policies or firewalls block communication on that port
Step 3: Install ONB Client on the OPC Client machine
- Copy and unzip the installation package onto the OPC Client machine.
- Select the appropriate setup based on your OS: use .NET Framework 4.0 for Windows 7 and higher / Server 2008 and higher, or .NET Framework 2.0 for legacy systems (Windows XP / Server 2003).
- Right-click the ONB Client setup executable and select “Run as administrator”.
- Follow the Install Wizard to complete the installation.
Step 4: Configure the ONB Client connection
- Run the ONB Client Configuration Tool as administrator.
- From the menu, click “ONB Connection” → “Add”.
- Enter the OPC Server’s IP address.
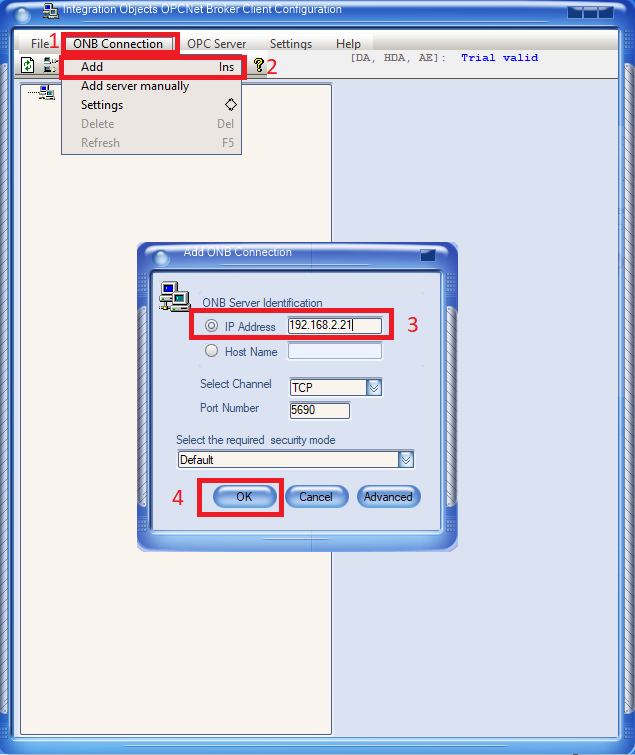
Figure 1: Add ONB Connection
- Click OK to fetch all OPC Servers available on the server machine.
- These servers are now registered locally on your OPC Client machine.
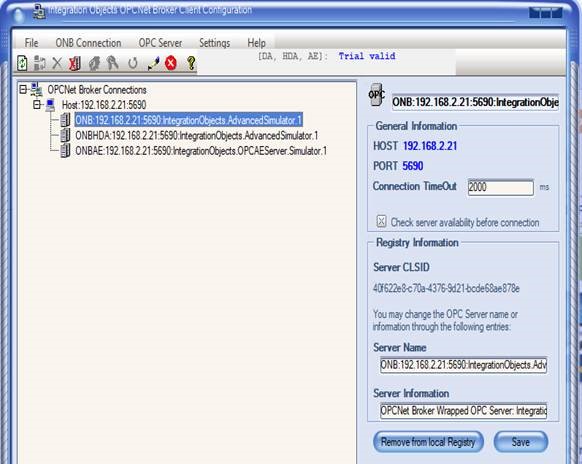
Figure 2: ONB Connections Listed on the Client Side
Step 5: Connect to your OPC Server via OPCNet Broker®
- Launch your OPC Client application.
- Browse local OPC Servers — you should now see OPCNet Broker® entries.
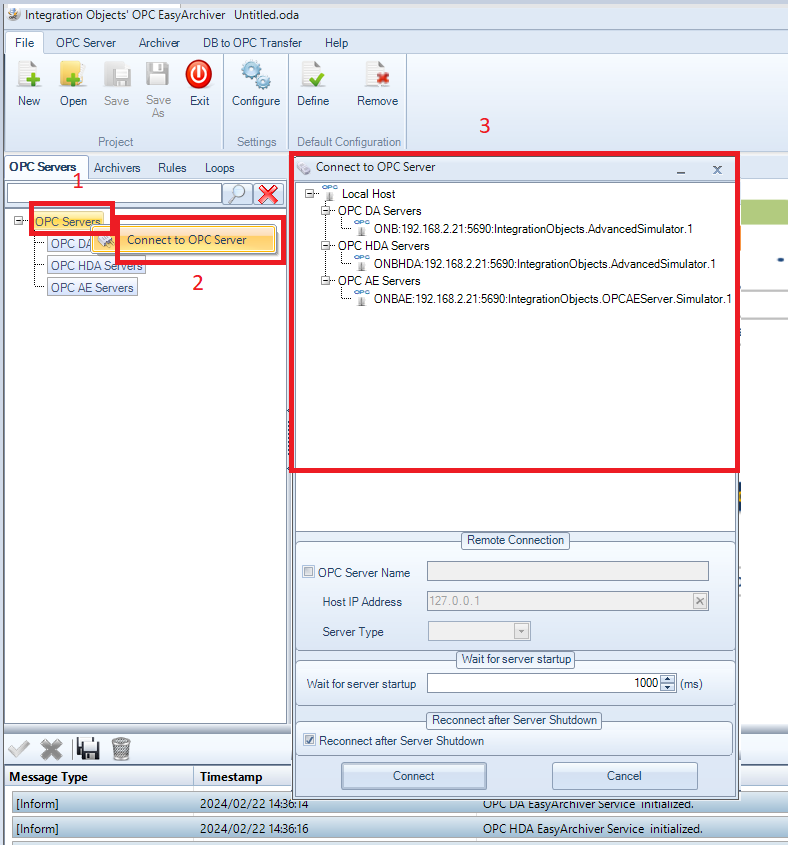
Figure 3: OPC Client Connected to OPC Server via ONB
- Connect and start reading live, historical, or event-based data through your new secure tunnel.
Benefits of using OPCNet Broker®
- Reduced cyber security risks:
- Secure, encrypted OPC communications
- No DCOM configuration required
- Seamless communications across firewalls and domains
- Improved performance and reliability
- Stable real-time data access
- Configurable timeout parameters
- Reduced maintenance cost
- Simplified configuration and troubleshooting by replacing complex DCOM settings with a dedicated OPC tunneling mechanism
- Simplified architecture with a single TCP port
Where OPCNet Broker® is used
Secure OPC tunnels built with OPCNet Broker® are widely deployed in:
- Oil & Gas
- Energy & Utilities
- Manufacturing
- Pharmaceuticals
- Industrial automation systems generally
They’re essential wherever reliable, secure, cross-network OPC communication is required – anywhere a firewall or a domain boundary currently stands between an OPC client and an OPC server.
OPCNet Broker® is a secure tunneling product that reduces downtime, boosts reliability, and keeps your industrial data moving. Whether you’re in oil and gas, utilities, manufacturing, or pharma, getting rid of DCOM and adopting a secure OPC tunneler like OPCNet Broker® is a smart step toward modernizing your data architecture.
Ready to try it yourself?
Frequently Asked Questions
How do I set up OPCNet Broker®?
Install OPCNet Broker® on both the server and client machines, configure the Windows service with an account that has OPC Server access, open the required firewall port, and connect via the ONB Client Configuration Tool - the full steps are above.
Is OPC tunneling with OPCNet Broker® secure?
Yes. When properly implemented with authentication, encryption, and access control, it provides a secure alternative to an unencrypted DCOM connection.
Does OPCNet Broker® support OPC DA, HDA, and AE?
Yes. OPCNet Broker® tunnels real-time (DA), historical (HDA), and event-based (AE) OPC Classic data through the same secure connection.
What happens if the network connection drops during setup or use?
OPCNet Broker® is designed to detect interruptions and re-establish the tunnel; for a deeper look at handling network drops and other tunneling issues, see our guide to common OPC Tunneling Issues
Does OPCNet Broker allow user to configure access rights for the OPC Server tags?
OPCNet Broker Server Side provides an optional OPC Tag Security add-on that enables fine-grained, tag-level access control. Access rights are configurable per user and consist of a set of permissions that define which tags in existing OPC servers assigned users are authorized to browse, read, write, or both read and write.