If you’ve ever struggled with DCOM errors, firewall restrictions, or unstable OPC connections, you’re definitely not alone.
Traditional OPC communication – especially in distributed environments – can be fragile, insecure, and time-consuming to configure.
This is where OPCNet Broker®, a secure and DCOM-free OPC tunneling solution, completely changes the game.
In this guide, you’ll learn how to complete an OPC tunnelling setup in under 15 minutes, from installation to configuration, so you can focus on operations instead of connectivity issues.
What is an OPC Tunnelling Setup?
An OPC tunnelling setup is a method used to connect an OPC client to an OPC server across networks without relying on DCOM.
It enables:
- Secure communication across firewalls and domains
- Reliable OPC data transfer over local or wide-area networks
- Stable connectivity for OPC DA, HDA, and AE data
Modern tunneling solutions like OPCNet Broker® replace complex DCOM configurations with a simple, secure, and high-performance architecture.
Why OPC Tunnelling is Needed (Avoid DCOM Issues)
DCOM-based OPC communication introduces several challenges:
- Complex configuration across machines and domains
- Firewall and port management difficulties
- Security vulnerabilities and attack surface exposure
- Poor reliability in distributed or remote environments
An OPC tunnelling setup eliminates these issues by abstracting DCOM entirely, ensuring secure and stable communication.
What is OPCNet Broker®?
OPCNet Broker® is a high-performance OPC tunneling plug and play product designed to:
- Eliminate DCOM configuration headaches
- Support real-time, historical, and event-based OPC data
- Secure OPC communication with data encryption and user authentication
- Simplify remote access across segmented or wide-area networks
Prerequisites:
Before starting, ensure you have the following:
- OPCNet Broker® installation package from here
- Admin rights on OPC server and client machines to run the installation programs
- Required .NET Framework version (2.0 or 4.0, depending on your OS version
- IP address of the OPC Server machine
- Firewall access to allow the ONB TCP port
Step1: Install ONB Server on the OPC Server Machine
- Copy and unzip the installation package onto the OPC Server machine
- Select the appropriate setup based on your OS:
- Use .NET Framework 4.0 for recent operating systems (Windows 7 + or Windows Server 2008+)
- Use .NET Framework 2.0 for legacy operating systems (Windows XP or Server 2003)
- Right-click the ONB Server setup executable and select “Run as administrator”
- Follow the Install Wizard to complete setup
Configure the ONB Server Service
- Open Windows Services
- Locate “Integration Objects OPCNet Broker® Server”
- Right-click -> Properties -> go to the “Log On” tab
- Choose “This account” and enter credentials for a user account with:
- Access to the OPC Server
- Read/Write permissions to the ONB folder and Windows Registry
- Start the “OPCNet Broker Server” Service
Step 2: Configure Firewall and Network Access
- Open the ONB TCP port between the server and client machines
- Ensure no security policies or firewalls block communication on that port
Step 3: Install ONB Client on the OPC Client Machine
- Copy and unzip the installation package onto the OPC Client machine
- Select the correct setup (Framework 4.0 or 2.0 per OS)
- Right-click the ONB Client setup executable and select “Run as administrator”
- Follow the Install Wizard to complete the installation
Step 4: Configure the ONB Client Connection
- Run the ONB Client Configuration Tool as administrator
- From the menu, click “ONB Connection” -> “Add”
- Enter the OPC Server’s IP address
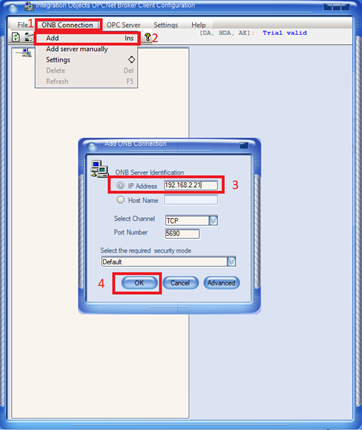
Figure 1: Add ONB Connection
- Click OK to fetch all OPC Servers available on the server machine
- These servers are now registered locally on your OPC Client machine
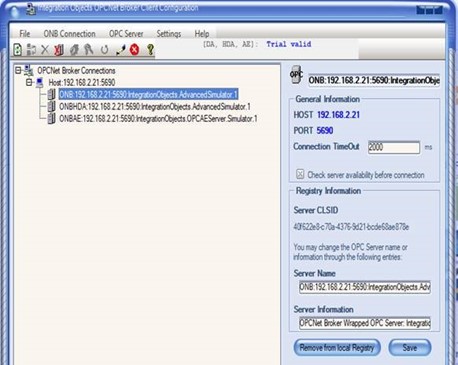
Figure 2: ONB Connections Listed on the Client Side
Step 5: Connect to your OPC Server via OPCNet Broker
- Launch your OPC Client application
- Browse local OPC Servers – you should now see OPCNet Broker® entries with a format like the example below:
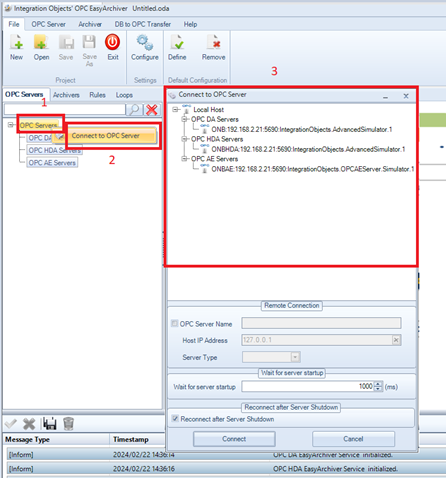
Figure 3: OPC Client Connected to OPC Server via ONB
- Connect and start reading live, historical, or event-based data through your new secure tunnel
Benefits of OPC Tunnelling with OPCNet Broker®
Using OPCNet Broker® for your OPC tunnelling setup allows you to:
- Eliminate DCOM complexity entirely
- Improve reliability across distributed systems
- Secure OPC communication with encryption
- Enable seamless connectivity across firewalls and domains
- Reduce downtime and maintenance effort
Industries Using OPC Tunnelling Solutions
OPC tunnelling is widely used in:
- Oil & Gas
- Utilities & Energy
- Manufacturing
- Pharmaceuticals
- Industrial Automation
Any industry relying on secure, real-time data exchange across networks can benefit from a modern OPC tunnelling setup.
Ready to Simplify Your OPC Tunnelling Setup?
Stop wasting time on DCOM configuration and unstable connections.
With OPCNet Broker®, you can deploy a secure, reliable OPC tunnelling setup in minutes.
👉Download OPCNet Broker® and start your setup today:
FAQ: OPC Tunnelling Setup
How do you set up OPC tunnelling?
To set up OPC tunnelling:
- Install tunneling software on server and client
- Configure firewall and network access
- Connect using the server IP address
- Access OPC servers locally through the client
Why avoid DCOM in OPC communication?
DCOM is complex to configure, difficult to secure, and unreliable across networks, especially in modern distributed environments.
What is the best OPC tunneling solution?
Modern solutions like OPCNet Broker® provide secure, DCOM-free OPC tunnelling with simplified deployment and strong performance.