Setting up a secure OPC tunnel between an OPC client and OPC server is essential for reliable, firewall-friendly, and secure industrial communication.
Traditional OPC Classic communication relies on DCOM, which introduces complexity, security risks, and configuration challenges, especially across networks, domains, and remote sites.
OPCNet Broker® provides a modern solution by replacing DCOM with a secure, high-performance OPC tunneling architecture using a single TCP port.
In this guide, you’ll learn step-by-step how to configure a secure OPC tunnel using OPCNet Broker®
What is OPCNet Broker®?
OPCNet Broker® is a secure OPC tunneling solution designed to simplify and protect OPC communication between clients and servers.
It enables:
- Secure OPC data transfer over TCP/IP
- Elimination of DCOM dependency
- Support for OPC DA, HDA, and AE
- Real-time, historical, and event data communication
- Secure access across firewalls, domains, and remote networks
By using OPCNet Broker®, organizations can deploy a secure OPC tunnel without complex network configuration.
What is a Secure OPC Tunnel?
A secure OPC tunnel is a communication channel that allows OPC clients and servers to exchange data:
- Without using DCOM
- Through encrypted or controlled TCP/IP communication
- Across firewalls, domains, and WAN environments
It ensures:
- Data integrity
- Secure authentication
- Reliable connectivity
- Simplified network configuration
OPCNet Broker® implements this by wrapping OPC traffic into a secure, controlled tunneling layer.
OPCNet Broker® Architecture Overview
OPCNet Broker® consists of two components:
- ONB Server → Installed on the OPC Server machine
- ONB Client → Installed on the OPC Client machine
Together, they create a secure OPC tunnel over a single configurable TCP port.
Step-by-Step: Configure a Secure OPC Tunnel
Follow the detailed instructions below on how to install and configure ONB:
-
In the OPC Server machine:
- Copy the downloaded package onto the OPC Server machine.
- Unzip the package:
- Use the ONB Server setup in the .Net Framework version 4.0 subfolder for Windows Server 2022, Windows Server 2019, Windows Server 2016, Windows Server 2012, Windows Server 2008, Windows 7, Windows 8, Windows 10 and Windows 11 operating systems.
- Use the ONB Server setup in the .Net Framework version 2.0 subfolder for Windows Server 2003 and Windows XP operating systems.
- Verify that you have the selected .Net framework version installed in the target machine.
- Right click on the ONBS setup executable and select “Run as administrator” from the displayed menu.
- Let the Install Wizard guide you through the installation.
- Configure the ONB Server service to run with a user account that has access rights to connect to and read data from your OPC Server. To do so:
- Open Windows services.
- Locate the “Integration Objects OPCNet Broker Server” service.
- Right click on it and select “Properties” from the displayed menu.
- Go to the “Log on” tab and configure the adequate user account under “This account” option. This user account needs to have privileges to connect to your OPC Server and read data as well as read/write access rights to the ONB installation folder and to the Windows registry.
- Start the “Integration Objects OPCNet Broker Server” service.
-
In the OPC Client machine:
- Copy the downloaded package onto the OPC Client machine.
- Unzip the package:
- Use the ONB Client setup in the .Net Framework version 4.0 subfolder for Windows Server 2022, Windows Server 2019, Windows Server 2016, Windows Server 2012, Windows Server 2008, Windows 7, Windows 8, Windows 10 and Windows 11 operating systems.
- Use the ONB Client setup in the .Net Framework version 2.0 subfolder for Windows Server 2003 and Windows XP operating systems.
- Verify that you have the selected .Net framework version installed in the target machine.
- Right click the ONBC setup executable and select “Run as administrator” from the displayed menu.
- Let the Install Wizard guide you through the installation.
- Right click on the ONB Client configuration Tool shortcut and select “Run as administrator” from the displayed menu.
- Click “ONB Connection” on the menu, then select “Add” from the displayed list.
- Enter the ONB Server IP address as illustrated below:
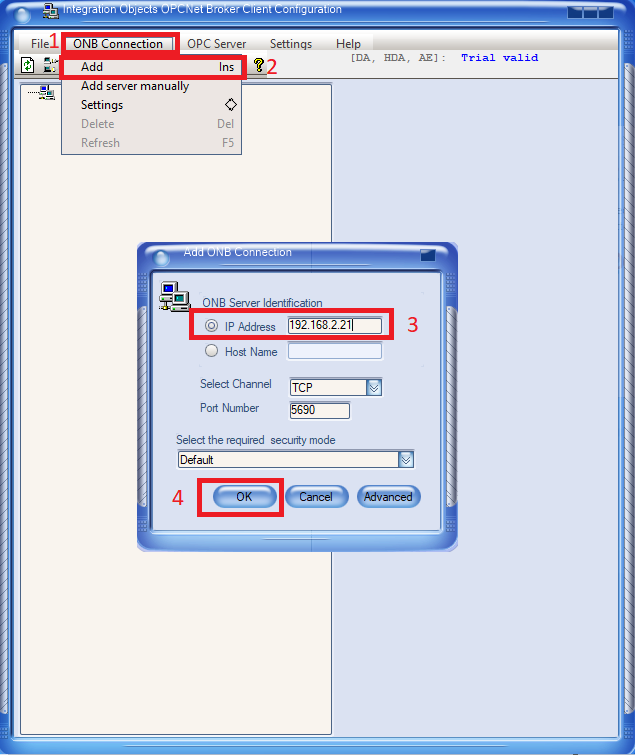
Figure 1: Add ONB Connection
- Click the “OK” button to add all OPC Servers available on the ONBS machine and register them in the ONBC machine.
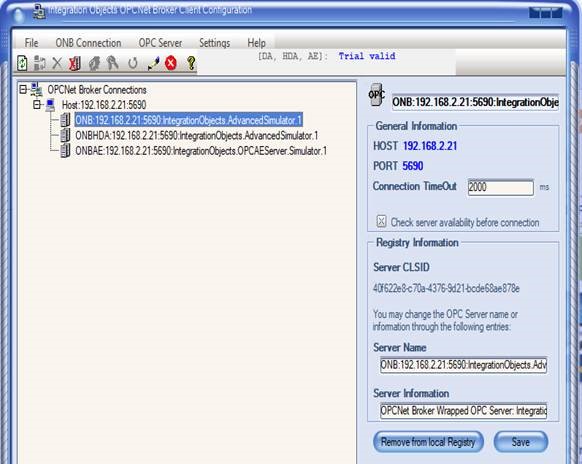
Figure 2: Added ONB Connections on the Client Side
- Configure your firewall to open the ONB TCP port between your client and server machines.
- Open your OPC Client, then browse your local OPC Servers and locate the entries created by the ONB Client when adding your ONB connection. These should have format illustrated in the example below.
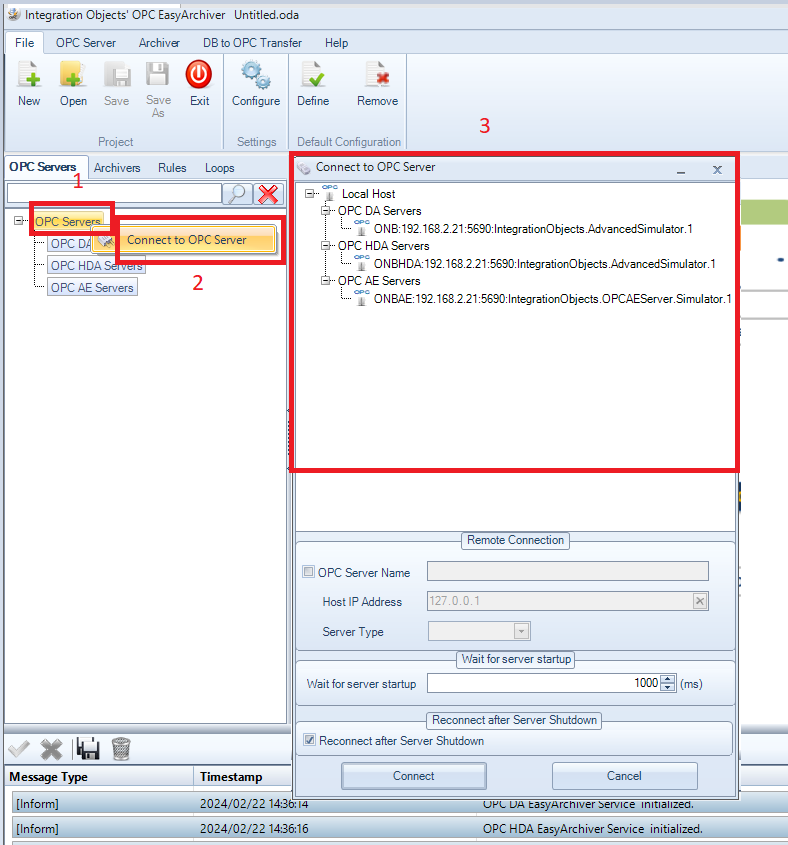
Figure 3: OPC Client Connected to OPC Server via ONB
Benefits of Using a Secure OPC Tunnel
Using OPCNet Broker® for your OPC tunneling setup provides:
- Secure, encrypted OPC communication
- No DCOM configuration required
- Seamless communication across firewalls and domains
- Improved performance and reliability
- Stable real-time data access
- Simplified architecture with one TCP port
Where Secure OPC Tunnels Are Used
Secure OPC tunnels are widely deployed in:
- Oil & Gas
- Energy & Utilities
- Manufacturing
- Pharmaceuticals
- Industrial automation systems
They are essential wherever reliable and secure cross-network OPC communication is required.
FAQ: Secure OPC Tunnel Configuration
Why use OPCNet Broker® for OPC tunneling?
Because it eliminates DCOM complexity, improves security, and enables reliable OPC communication across networks using a single TCP port.
How do you configure a secure OPC tunnel?
You install OPCNet Broker® on both server and client machines, configure the service, set firewall rules, and connect via the client configuration tool.
Is OPC tunneling secure?
Yes- when properly implemented with authentication, encryption, and access control, OPC tunneling provides a secure alternative to DCOM